
Object detection and localization using YOLO
Faisal Qureshi
Professor
Faculty of Science
Ontario Tech University
Oshawa ON Canada
http://vclab.science.ontariotechu.ca
Copyright information
© Faisal Qureshi
License

This work is licensed under a Creative Commons Attribution-NonCommercial 4.0 International License.
Introduction
The goal of this lab is to learn how to use YOLO (Redmon et al. 2015) deep learning framework for object detection and localization. Specifically, we will use YOLO to detect road signs in https://www.kaggle.com/datasets/andrewmvd/road-sign-detection.
YOLO (You Only Look Once) is a real-time object detection algorithm that processes images in a single pass, predicting both bounding boxes and class probabilities (Figure 1).

Figure 1: YOLO predicts object classes and their bounding boxes. (Figure from Redmon et al. 2015. )
Convolutional layers extract features
YOLO utilizes a series of convolutional layers to extract features from input images (Figure 2). It divides the input image into a grid and makes predictions based on the features extracted from each grid cell.
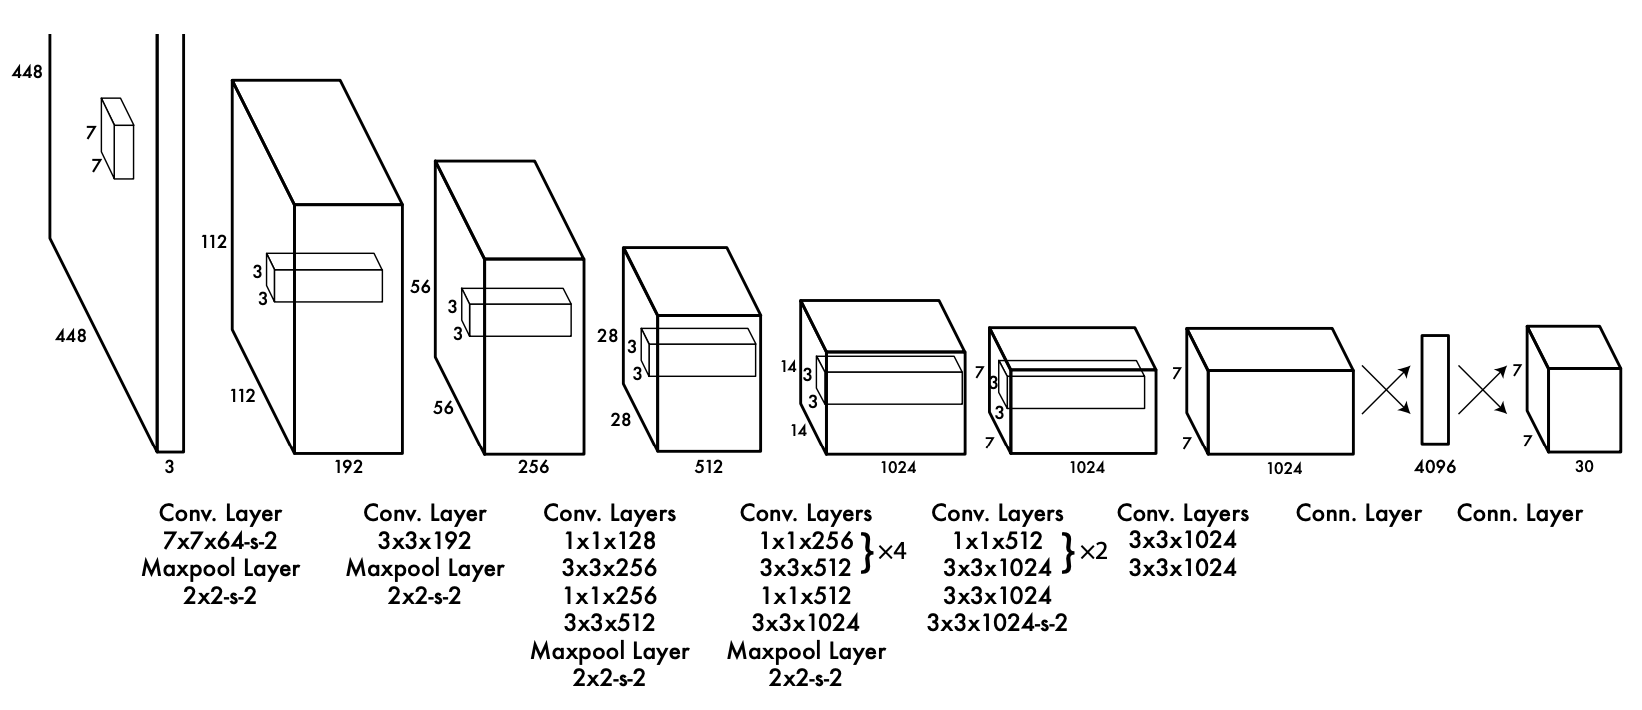
Figure 2: 24 convolutional layers followed by 2 fully connected layers. Alternating 1 × 1 convolutional layers reduce the features space from preceding layers. The convolutional layers are pretrained on the ImageNet classification task at half the resolution (224 × 224 input image) and then double the resolution for detection. (Figure from Redmon et al. 2015.)
Learning outcomes
- Setting up YOLO
- Using YOLO for object detection and localization
- Training YOLO on your dataset(s)
What to submit
Go to the end of this notebook to see what you need to submit.
Setting up YOLO via commandline
We will use YOLO implementation by Ultralytics. You can get detailed information about how to setup and use YOLO on your machine at https://docs.ultralytics.com/yolov5/.
Downloading YOLO
$ git clone https://github.com/ultralytics/yolov5.git
This download YOLO in yolov5 folder.
Setting up the Python environment
$ python3 -m venv venv-yolov5
$ source venv-yolov5/bin/activate
(venv-yolov5) $ pip install -r yolov5/requirements.txt
Running YOLO on commandline
Performing inference on an image
Use the following command to use YOLO to perform object detection on a image.
(venv-yolov5) $ python detect.py --source data/images/bus.jpg --view
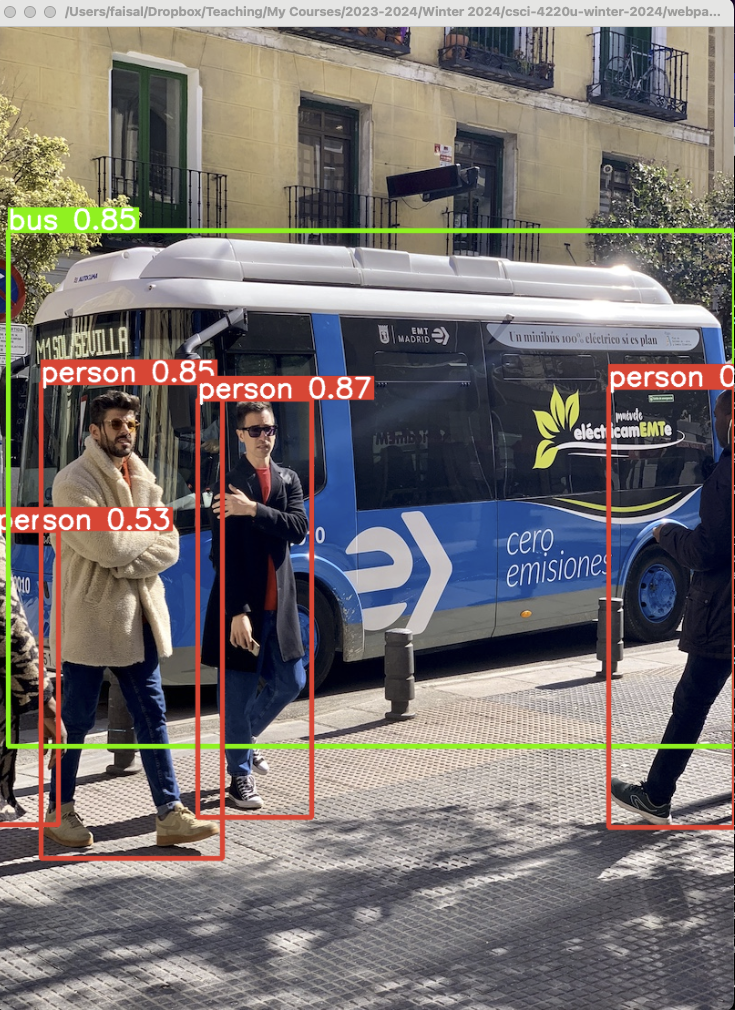
Figure 3 YOLO object detection.
Performing inference on webcam video
Use the following command to use YOLO to perform object detection on the video captured by your webcam.
(venv-yolov5) $ python detect.py --source 0
Aside: my laptop has one webcam, whose id is 0. If only a single webcam is attached to your machine then most likely its id will be 0.
More options
Check out the detect.py to see the commandline options available to you. E.g., it is possible to perform object detection on images stored in a folder, video, etc.
Check
(venv-yolov5) $ python detect.py --help
for a complete list of available commandline options.
YOLO Variants
YOLO comes in many variants, i.e., different network sizes. By default the network downloads yolov5s.pt model. You can, however, specify other models.
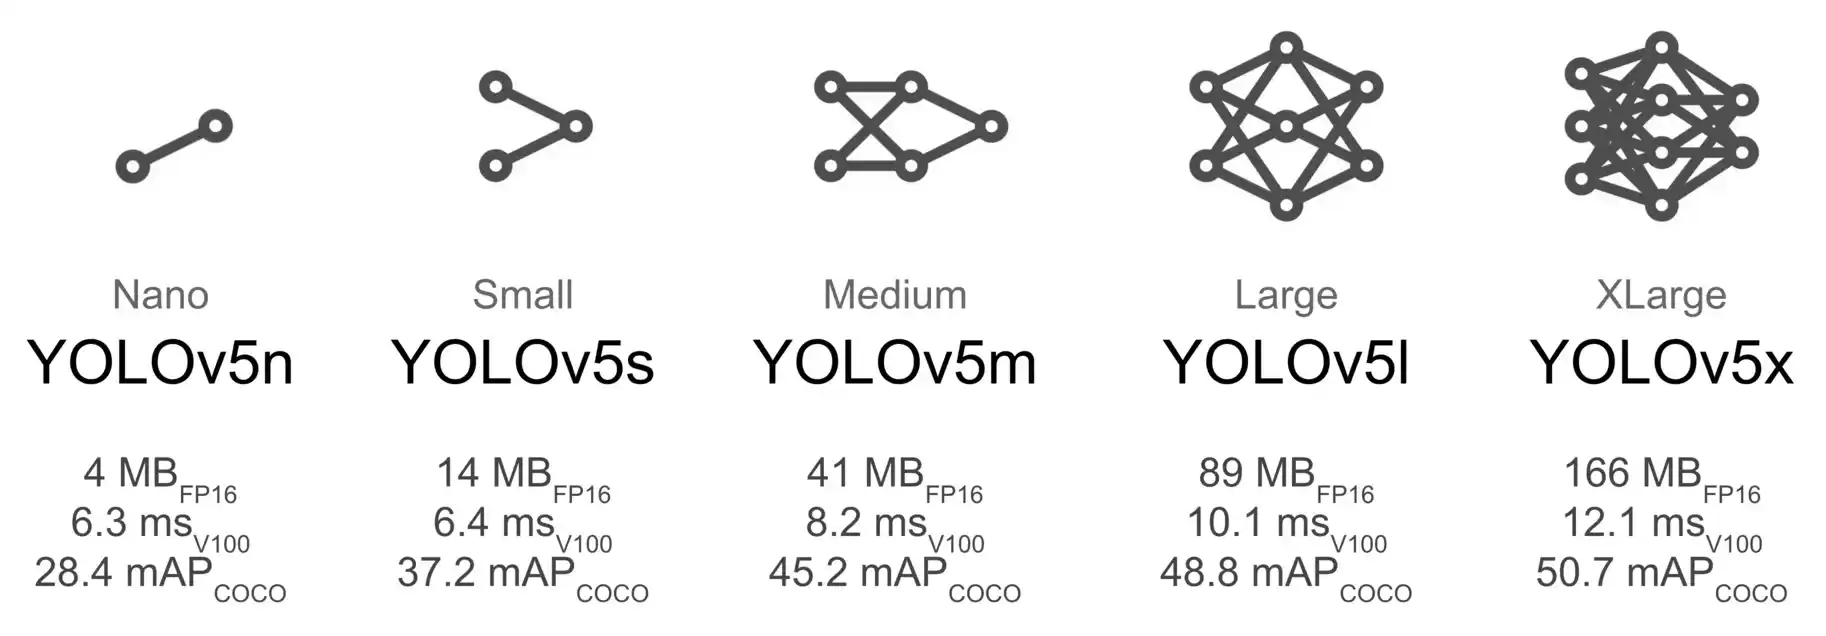
Figure 3YOLO v5 variants.
Example: Tiny YOLO
For example, we can specify to use the tiny YOLO when performing inference as follows:
(venv-yolov5) $ python detect.py --weights yolov5n.pt --source data/images/bus.jpg
Note that the program will download the pretrained weights, yolov5n.pt, as needed.
Using YOLO within the Jupyter environment
In the previous examples, we have used YOLO from the commandline. It is also possible to use YOLO from within the Jupyter environment.
Install YOLO within the Jupyter environment
!pip install --quiet ultralytics
[notice] A new release of pip is available: 23.3.1 -> 24.0
[notice] To update, run: pip install --upgrade pip
Use YOLO in Jupyter Lab
Next, within the Jupyter lab environment you can use YOLO to perform inference. YOLO downloads the weights as needed.
from ultralytics import YOLO
model = YOLO('06-object-detection-using-yolo/yolov8n.pt')
model.info()
results = model('06-object-detection-using-yolo/bus.jpg')

from ultralytics.utils.plotting import Annotator
import matplotlib.pyplot as plt
import cv2

annotator = Annotator(cv2.cvtColor(results[0].orig_img, cv2.COLOR_BGR2RGB))
boxes = results[0].boxes
for box in boxes:
    b = box.xyxy[0]  # get box coordinates in (left, top, right, bottom) format
    c = box.cls
    annotator.box_label(b, model.names[int(c)])

plt.imshow(annotator.result())
YOLOv8n summary: 225 layers, 3157200 parameters, 0 gradients, 8.9 GFLOPs

image 1/1 /Users/faisal/Dropbox/Teaching/My Courses/2023-2024/Winter 2024/csci-4220u-winter-2024/webpage-source/labs/06-object-detection-using-yolo/bus.jpg: 640x480 4 persons, 1 bus, 1 stop sign, 44.0ms
Speed: 1.7ms preprocess, 44.0ms inference, 0.7ms postprocess per image at shape (1, 3, 640, 480)
<matplotlib.image.AxesImage at 0x2b339ecd0>
Training YOLO
Now that we are able to use YOLO for out-of-the-box object detection. We will turn our attention to training YOLO on our dataset. We will use the COCO128 to experiment with model training.
COCO128 Dataset
Download the COCO128 dataset from https://www.kaggle.com/datasets/ultralytics/coco128. You may need to create a free Kaggle account in order to download this dataset. You can also download COCO128 from here. I am hosting COCO128 for the purposes of this course only.
Anatomy of the COCO128
Once downloaded the COCO128 folder looks as shown below.
(venv-yolov5) $ coco128 tree -L 2
.
├── LICENSE
├── README.txt
├── images
│   └── train2017
└── labels
    └── train2017
Important: note that the folder doesnot contain any test images. This is a toy dataset that is used for the purposes of understanding YOLO training regime. The same set of images are used for both training and testing.
The dataset consists of two top-level folder: images and labels:
images/train2017folder contains images;labels/train2017folder contains text files, one per image, that include annoations. For example, see Figure 4 below
Annotation files
The annotation files contain one object annotation per line using the following format
txt
class-id centerx centery width height
class-iddenotes object class. This information is found in an accompanying yaml file, e.g., coco128.yaml, that describes the dataset.- The image is resized to have height and width equal to $1$, and
centerx,centery,widthandheightis described within the normalized coordinates.
Figure 4 illustrates YOLO annotations:
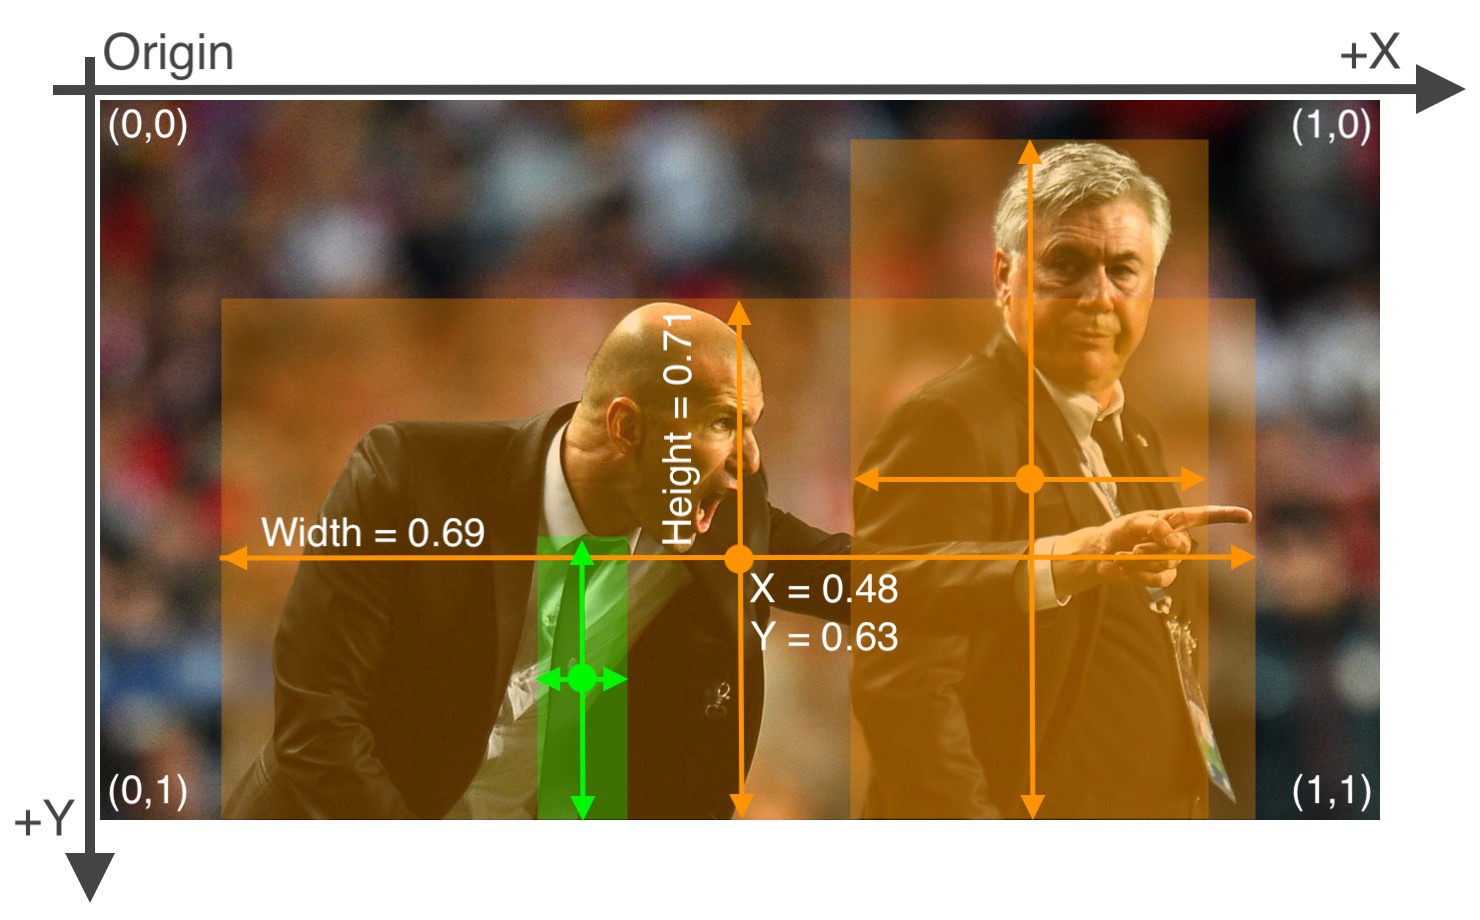
Figure 4 Image 000000000036.jpg
Example images with annotation files
Figure 5 Image 000000000081.jpg
The corresponding annotation file is 000000000081.txt
txt
4 0.516492 0.469388 0.912516 0.748282
Similarly, consider Figure 5 below
Figure 6 Image 000000000036.jpg
The corresponding annotation file is 000000000036.txt
txt
25 0.475759 0.414523 0.951518 0.672422
0 0.671279 0.617945 0.645759 0.726859
Training on COCO128 dataset
YOLO requires a YAML file that describes the dataset. See coco128.yaml that we will use to train YOLO on COCO128 dataset. coco128.yaml file has the following structure.
path: "/Users/faisal/Dropbox/Teaching/My Courses/2023-2024/Winter 2024/csci-4220u-winter-2024/webpage-source/labs/data/datasets-do-not-upload/coco128"
train: images/train2017
val: images/train2017
test: (optional)
names:
  0: person
  1: bicycle
...
download: download-script-or-data-url (OPTIONAL)
path: path of the root directory for the dataset.train: path of the directory containing training images (relative topath).val: path of the directory containing validation images (relative topath).test: path of the directory containing test images (relative topath). This is optional.names: list of class indices and their namesdownload: download link or a script. This is optional.
Note that annotations files are loaded from the mirror path(s). E.g., for training images:
- Images are loaded from
images/train2017; and - Corresponding annotation files are loaded from
labels/train2017.
I edited the default coco128.yaml file to suit my setup. I only had to update the path to the root folder for COCO128.
txt
...
path: "/Users/faisal/Dropbox/Teaching/My Courses/2023-2024/Winter 2024/csci-4220u-winter-2024/webpage-source/labs/data/datasets-do-not-upload/coco128"
...
Pretrained model
It is recommended to use a pre-trained YOLO model and "further train" it on your datasets.
from ultralytics import YOLO

model = YOLO('06-object-detection-using-yolo/yolov8n.pt')  # load a pretrained model
model.info()
YOLOv8n summary: 225 layers, 3157200 parameters, 0 gradients, 8.9 GFLOPs
(225, 3157200, 0, 8.8575488)
Inference using pretrained model
Let's use this model to perform inference. Since this is a pretrained model, it already does quite well at person detection. The model found both Zidane and Ancelloti.
results = model(source='06-object-detection-using-yolo/zidane.jpg')

from ultralytics.utils.plotting import Annotator
import matplotlib.pyplot as plt
import cv2

annotator = Annotator(cv2.cvtColor(results[0].orig_img, cv2.COLOR_BGR2RGB))
boxes = results[0].boxes
for box in boxes:
    b = box.xyxy[0]  # get box coordinates in (left, top, right, bottom) format
    c = box.cls
    annotator.box_label(b, model.names[int(c)])

plt.imshow(annotator.result())
image 1/1 /Users/faisal/Dropbox/Teaching/My Courses/2023-2024/Winter 2024/csci-4220u-winter-2024/webpage-source/labs/06-object-detection-using-yolo/zidane.jpg: 384x640 2 persons, 1 tie, 41.9ms
Speed: 1.6ms preprocess, 41.9ms inference, 0.6ms postprocess per image at shape (1, 3, 384, 640)
<matplotlib.image.AxesImage at 0x2fd383c10>
Training a model from scratch
It is also possible, although not recommended, to train a model from scratch.
from ultralytics import YOLO

model = YOLO('06-object-detection-using-yolo/yolov8n.yaml')  # Using yolov8n structure, but randomly initialized weights
model.info()
YOLOv8n summary: 225 layers, 3157200 parameters, 3157184 gradients, 8.9 GFLOPs
(225, 3157200, 3157184, 8.8575488)
Inference using a randomly initialized model
Let's use this model to perform inference. Recall that this model is not pretrained.
You'll notice that the model fails to find both Zidane and Ancelotti.
results = model(source='06-object-detection-using-yolo/zidane.jpg')

from ultralytics.utils.plotting import Annotator
import matplotlib.pyplot as plt
import cv2

annotator = Annotator(cv2.cvtColor(results[0].orig_img, cv2.COLOR_BGR2RGB))
boxes = results[0].boxes
for box in boxes:
    b = box.xyxy[0]  # get box coordinates in (left, top, right, bottom) format
    c = box.cls
    annotator.box_label(b, model.names[int(c)])

plt.imshow(annotator.result())
image 1/1 /Users/faisal/Dropbox/Teaching/My Courses/2023-2024/Winter 2024/csci-4220u-winter-2024/webpage-source/labs/06-object-detection-using-yolo/zidane.jpg: 384x640 (no detections), 42.1ms
Speed: 1.5ms preprocess, 42.1ms inference, 0.4ms postprocess per image at shape (1, 3, 384, 640)
<matplotlib.image.AxesImage at 0x2c8e84a50>
Training: other considerations
Check out https://docs.ultralytics.com/modes/train/#arguments for a list of arguments for train method. Especially check out freeze argument:
Freezes the first N layers of the model or specified layers by index, reducing the number of trainable parameters. Useful for fine-tuning or transfer learning.
from ultralytics import YOLO

use_pretrained = True

if use_pretrained:
    print('Using a pretrained model')
    model = YOLO('06-object-detection-using-yolo/yolov8n.pt')  # load a pretrained model
else:
    print('Using a scratch model')
    model = YOLO('06-object-detection-using-yolo/yolov8n.yaml') # load a scratch model

model.info()

device = 'mps' # Since I am running this on Apple Silicon
epochs = 1
data = '06-object-detection-using-yolo/coco128.yaml'

# Uncomment the following to train
# This takes a while
#results = model.train(data=data, epochs=epochs, device=device);
Using a pretrained model
YOLOv8n summary: 225 layers, 3157200 parameters, 0 gradients, 8.9 GFLOPs
Self-Test
At this point, please confirm that you are able to complete the following tasks:
- Install ultralytics YOLO distribution.
- Use pretrained YOLO model to detect objects in images/videos.
- You should also be able to visualize the object detection results.
- Download COCO128 dataset and be familiar with the yaml file that describes its structure.
- Train a YOLO model from scratch on COCO128 dataset.
- Use the trained YOLO model to detect objects in images from the COCO128 dataset
Train YOLO to detect road signs
Recall the very first lab of this course. There you were asked to use template matching techniques to identify the stop signs in https://www.kaggle.com/datasets/andrewmvd/road-sign-detection. The dataset is also available here. I have made it available for educational purposes.
You are now ready to use YOLO to detect road signs in this dataset. Let's do that. You'll need to complete the following tasks.
Convert road-sign-detection dataset to use YOLO annotations.
Recall that road sign detection dataset annotation are stored in XML format.
Example road0.xml
txt
<annotation>
    <folder>images</folder>
    <filename>road0.png</filename>
    <size>
        <width>267</width>
        <height>400</height>
        <depth>3</depth>
    </size>
    <segmented>0</segmented>
    <object>
        <name>trafficlight</name>
        <pose>Unspecified</pose>
        <truncated>0</truncated>
        <occluded>0</occluded>
        <difficult>0</difficult>
        <bndbox>
            <xmin>98</xmin>
            <ymin>62</ymin>
            <xmax>208</xmax>
            <ymax>232</ymax>
        </bndbox>
    </object>
</annotation>
We need to convert this into the annotation format used by YOLO. Check the section on COCO128 dataset.
Data pipelines
Deep learning belongs to the category of data-driven approaches. Consequently, a big part of developing deep learning solutions is to construct efficient and highly scalable data pipelines. Once the data pipeline is in place, it is much easier to develop deep learning models and capture their performance.
In this lab, you are asked to take the road-sign-detection dataset and transform it into a form that YOLO can understand. The lessons learned here will be useful as you develop larger, more sophisticated deep learning models.
Constructing YOLO data pipeline from road-sign-detection dataset
The following code taken from https://blog.paperspace.com/train-yolov5-custom-data/ does just that. It takes an XML file and outputs annotations found within as YOLO format. The code also create txt files, one per image, to store the annotations. This is similar to how COCO128 dataset is structured.
import xml.etree.ElementTree as ET

# Function to get the data from XML Annotation
def extract_info_from_xml(xml_file):
    root = ET.parse(xml_file).getroot()

    # Initialise the info dict
    info_dict = {}
    info_dict['bboxes'] = []

    # Parse the XML Tree
    for elem in root:
        # Get the file name
        if elem.tag == "filename":
            info_dict['filename'] = elem.text

        # Get the image size
        elif elem.tag == "size":
            image_size = []
            for subelem in elem:
                image_size.append(int(subelem.text))

            info_dict['image_size'] = tuple(image_size)

        # Get details of the bounding box
        elif elem.tag == "object":
            bbox = {}
            for subelem in elem:
                if subelem.tag == "name":
                    bbox["class"] = subelem.text

                elif subelem.tag == "bndbox":
                    for subsubelem in subelem:
                        bbox[subsubelem.tag] = int(subsubelem.text)
            info_dict['bboxes'].append(bbox)

    return info_dict

# Dictionary that maps class names to IDs
class_name_to_id_mapping = {"trafficlight": 0,
                           "stop": 1,
                           "speedlimit": 2,
                           "crosswalk": 3}

# Convert the info dict to the required yolo format and write it to disk
def convert_to_yolov5(info_dict, rootpath='.', write_to_file=False):
    print_buffer = []

    # For each bounding box
    for b in info_dict["bboxes"]:
        try:
            class_id = class_name_to_id_mapping[b["class"]]
        except KeyError:
            print("Invalid Class. Must be one from ", class_name_to_id_mapping.keys())

        # Transform the bbox co-ordinates as per the format required by YOLO v5
        b_center_x = (b["xmin"] + b["xmax"]) / 2
        b_center_y = (b["ymin"] + b["ymax"]) / 2
        b_width    = (b["xmax"] - b["xmin"])
        b_height   = (b["ymax"] - b["ymin"])

        # Normalise the co-ordinates by the dimensions of the image
        image_w, image_h, image_c = info_dict["image_size"]
        b_center_x /= image_w
        b_center_y /= image_h
        b_width    /= image_w
        b_height   /= image_h

        #Write the bbox details to the file
        print_buffer.append("{} {:.3f} {:.3f} {:.3f} {:.3f}".format(class_id, b_center_x, b_center_y, b_width, b_height))

    if write_to_file:
        # Name of the file which we have to save
        save_file_name = os.path.join(rootpath, "annotations", info_dict["filename"].replace("png", "txt"))

        # Save the annotation to disk
        print("\n".join(print_buffer), file= open(save_file_name, "w"))
    else:
        return print_buffer
xml_file = '06-object-detection-using-yolo/road0.xml'
xml_info = extract_info_from_xml(xml_file)
print('xml_info:\n', xml_info)

yolo_annotations = convert_to_yolov5(xml_info)
print('yolo_annotations:\n', yolo_annotations)
xml_info:
 {'bboxes': [{'class': 'trafficlight', 'xmin': 98, 'ymin': 62, 'xmax': 208, 'ymax': 232}], 'filename': 'road0.png', 'image_size': (267, 400, 3)}
yolo_annotations:
 ['0 0.573 0.367 0.412 0.425']
You can use the above methods to iterate through all XML files and construct the text annotation files as follows.
!!! Note that the following code will create one text file per xml file in the xml file folder. !!!
import os
!pip install tqdm
from tqdm import tqdm

# Rootpath indicates the root folder where you have stored the road-sign-detection dataset
rootpath = "/Users/faisal/Dropbox/Teaching/My Courses/2023-2024/Winter 2024/csci-4220u-winter-2024/webpage-source/labs/data/datasets-do-not-upload/road-sign-detection"

annotations = [os.path.join(rootpath,'annotations', x) for x in os.listdir(os.path.join(rootpath,'annotations')) if x[-3:] == "xml"]
annotations.sort()

for ann in tqdm(annotations):
    info_dict = extract_info_from_xml(ann)
    convert_to_yolov5(info_dict, rootpath=rootpath, write_to_file=True)
annotations = [os.path.join(rootpath,'annotations', x) for x in os.listdir(os.path.join(rootpath,'annotations')) if x[-3:] == "txt"]
Requirement already satisfied: tqdm in ./yolo-lab/venv-yolov5/lib/python3.11/site-packages (4.66.2)

[notice] A new release of pip is available: 23.3.1 -> 24.0
[notice] To update, run: pip install --upgrade pip
100%|███████████████████████████████████████████| 877/877 [00:00<00:00, 7283.93it/s]
Check annotations
It is wise to check the annotations. Check out the annotation code above to see how you can draw bounding boxes and class labels on the images.
Split data into train, validation, and test sets
The following code construct 6 lists:
- train_images;
- train_annotations;
- val_images;
- val_annotations;
- test_images; and
- test_annotations.
Each list contain filenames.
import random
!pip install --quiet scikit-learn
from sklearn.model_selection import train_test_split

images = [os.path.join(rootpath, 'images', x) for x in os.listdir(os.path.join(rootpath, 'images'))]
annotations = [os.path.join(rootpath,'annotations', x) for x in os.listdir(os.path.join(rootpath,'annotations')) if x[-3:] == "txt"]

images.sort()
annotations.sort()

train_images, val_images, train_annotations, val_annotations = train_test_split(images, annotations, test_size = 0.2, random_state = 1)
val_images, test_images, val_annotations, test_annotations = train_test_split(val_images, val_annotations, test_size = 0.5, random_state = 1)
[notice] A new release of pip is available: 23.3.1 -> 24.0
[notice] To update, run: pip install --upgrade pip
Moving/copying images to their respective folders
Move train, validation and test files (images and annotations) to their own directories. For the road sign detection dataset you can use the following layout (inspired by COCO128).
txt
➜  road-sign-detection tree .
.
├── images
│   ├── test
│   ├── train
│   └── val
└── labels
    ├── test
    ├── train
    └── val
This process can be easily automated using Python shell utilities package.
def move_files_to_folder(list_of_files, destination_folder):
    for f in list_of_files:
        try:
            shutil.move(f, destination_folder)
        except:
            print(f)
            assert False
Create a data (yaml) file that YOLO will use to train on the road-sign-detection dataset.
The yaml file that describes the road-sign-detection dataset will look something like
path: /path/to/Road_Sign_Dataset
train: images/train/
val:  images/val/
test: images/test/

nc: 4

names: ["trafficlight", "stop", "speedlimit",  "crosswalk"]
YOLO models for road sign detection
Now you have everything that you need to train YOLO to detect road signs.
TO DO
- Construct a pretrained YOLO and capture its performance on the test set without any training.
- Construct a pretrained YOLO. Train it for 5 epochs on the training set. Then capture its performance on the test set.
- Train a YOLO from scratch for 5 and 15 epochs on the training set. Then capture its performance on the test set.
- Construct a table that compares the performance obtained under various settings.
- Pick a small subset of test images and show qualitative results under various settings.
Train, validation and test sets here refer to the road-sign-detection dataset.
Important Let's use Tiny YOLO for these experiments.
Jupyter notebook
Source notebook is available here.
What to submit
- Table constructed in step 4.
- Qualitative results in step 5.
- Model weights in steps 1, 2, and 3.
GPU resources
(Experimental) You can use the GPU resources available at https://hubdev.science.ontariotechu.ca/ to complete your lab.
